

How to Prevent Diaper Rash A Parent's Guide
Ah, diaper rash. If you're a parent, you've either battled it or you're living in constant fear of its arrival. Let's be honest, seeing that angry red rash on your baby's bottom is just plain awful. But here's the good news: preventing it is way easier than treating it.
Most diaper rash comes down to two simple things: too much moisture and friction. When your baby's delicate skin stays wet, its natural protective barrier breaks down. Mix in the constant rubbing from a diaper, and you’ve got a recipe for irritation.
Our goal is to stop that cycle before it ever starts.
Your Guide to a Happy Rash-Free Baby
The whole game plan for preventing diaper rash can be summed up in three words: keep it clean, keep it dry, and keep it protected. It's not about complicated routines or expensive gadgets. It’s about consistency and a little know-how.
Believe me, this is a universal parenting struggle. Studies show that a whopping 67–70% of infants will get diaper rash at some point. So if you're dealing with it, you are definitely not alone.
This guide is going to walk you through the practical, real-world stuff that actually works. Think of it as a conversation with a friend who’s been in the trenches and has a few tricks up their sleeve.
Quick Diaper Rash Prevention Checklist
Here's a quick look at the core strategies we'll explore in detail. This is your cheat sheet for keeping your baby's skin happy.
| Core Principle | Why It Matters | Simple Action Step |
|---|---|---|
| Keep It Clean | Removes irritants like urine and stool that break down the skin. | Gently wipe or rinse the area at every diaper change. |
| Keep It Dry | Moisture weakens the skin's barrier, making it vulnerable to rashes. | Pat the skin completely dry or let it air dry before putting on a new diaper. |
| Keep It Protected | A barrier cream shields the skin from moisture and friction. | Apply a thin, even layer of a zinc oxide-based cream after every change. |
This table really just scratches the surface. Now, let's dive into the details of putting this into practice every single day.
The Core Prevention Strategy
Mastering the diaper change is your first line of defense. It's a simple, repeatable routine that makes all the difference.
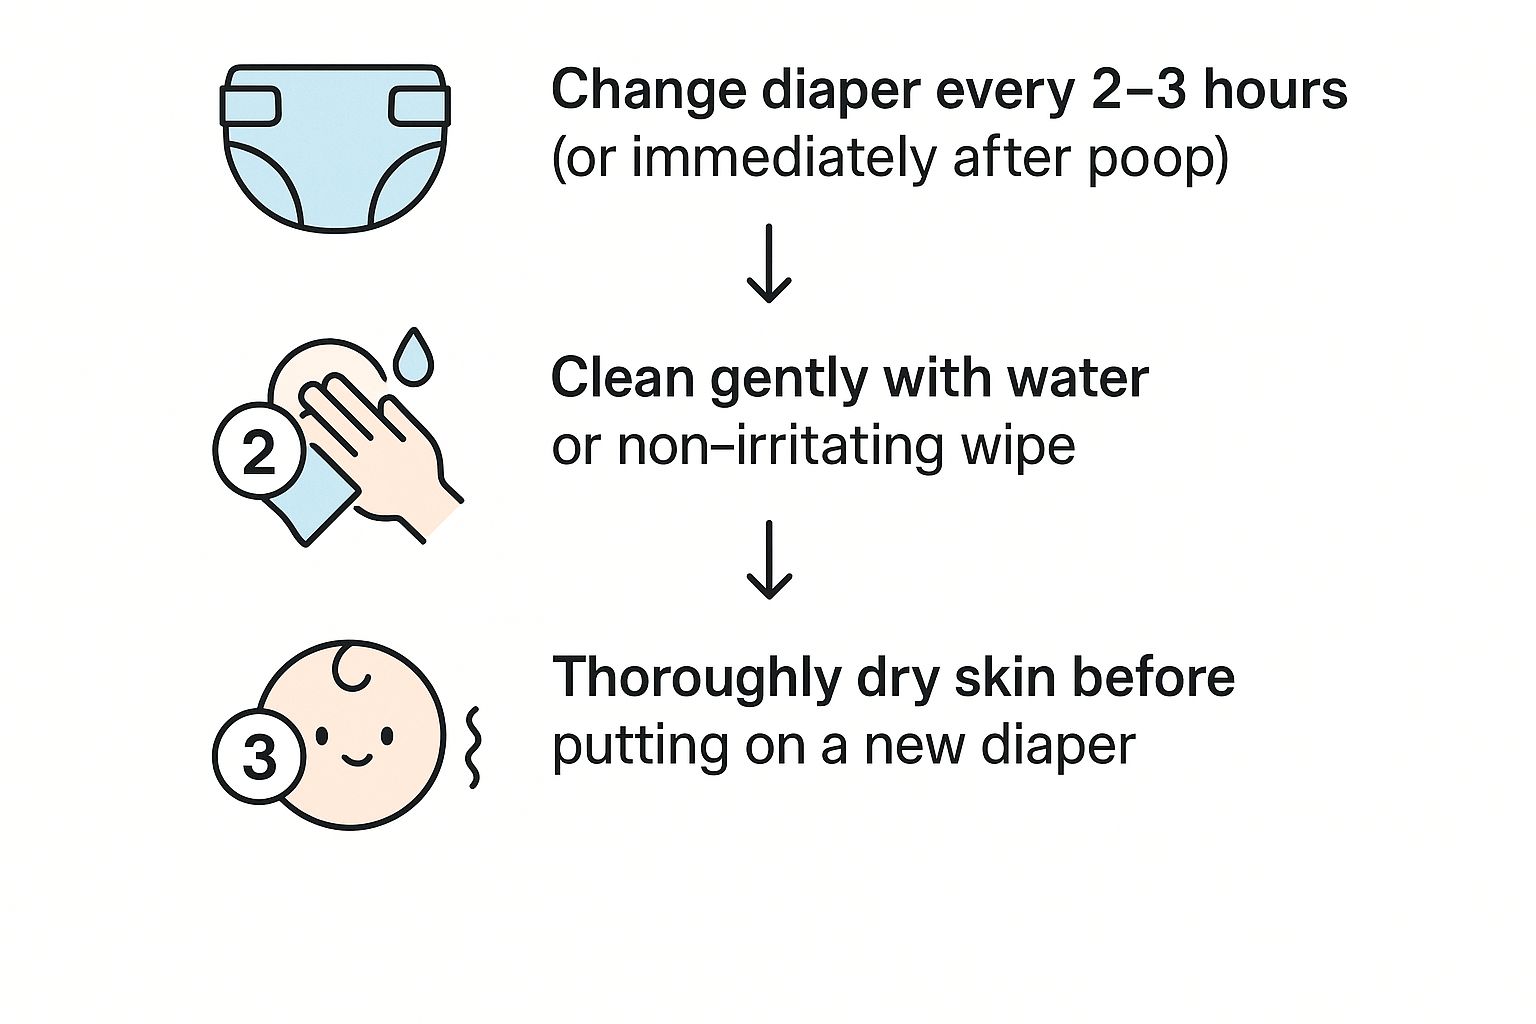
As you can see, it’s the combination of changing diapers often, cleaning gently, and drying thoroughly that creates that powerful protective shield. It's not just one thing; it's the whole process.
We’re going to cover everything—from the best way to change a diaper to picking the right products and even the magic of giving your baby some "air time." Even the clothes they wear can play a part. Choosing the right materials is crucial, especially for babies with extra-sensitive skin. For a deeper dive on that, you might want to read our guide on the best fabric for sensitive skin.
Let's get that little bottom back to being perfectly smooth and happy.
Mastering the Diaper Change for Prevention

Think of your changing table as the first line of defense in the battle against diaper rash. Each diaper change isn't just a chore; it's a chance to protect and care for your baby's most sensitive skin. Getting this simple, consistent routine right is what builds a powerful shield against irritation.
It all boils down to three key things: frequency, cleansing, and drying. If you can nail these, you'll make a world of difference.
The Importance of Frequent Changes
Honestly, the most powerful habit you can build is changing your baby's diaper often. It’s not just about keeping them comfortable—it’s about cutting down the time their skin is exposed to moisture and irritants from urine and stool, which are the main culprits behind diaper rash.
A good rule of thumb is to aim for a change every 2 to 3 hours during the day, even if the diaper doesn’t feel that full. For newborns, you’ll probably be changing them even more frequently. And of course, a poopy diaper needs to be dealt with immediately. No exceptions there.
"Prolonged contact with a wet or soiled diaper is the number one cause of irritant dermatitis. By staying ahead of it, you're not just cleaning up a mess—you're actively preventing the skin's protective barrier from breaking down."
This proactive approach is everything. Research actually shows that the frequency of diaper changes is a massive factor in skin health. In many parts of the world, caregivers change diapers 8–10 times per day, a practice that helps keep that delicate skin healthy by minimizing exposure.
Gentle and Effective Cleansing Techniques
Once the dirty diaper is off, how you clean the area is the next critical step. The goal is to be thorough but incredibly gentle. Wiping too aggressively can cause friction and damage the very skin you're trying to protect.
You've got a couple of great options, and the best one often just depends on the situation and how sensitive your baby’s skin is.
- Plain Water and a Soft Cloth: This is the gold standard, especially for babies with super sensitive skin or during a mild flare-up. Just use lukewarm water with a soft washcloth or some cotton pads and gently pat the area clean. Simple and effective.
- Sensitive, Fragrance-Free Wipes: Let's be real, wipes are incredibly convenient. The trick is to choose wisely. Always grab wipes that are alcohol-free and fragrance-free, since those are two of the most common skin irritants.
No matter what you use, always wipe from front to back, especially for little girls, to avoid spreading bacteria. And remember the golden rule: pat, don't scrub.
The Critical Step of Thorough Drying
This is the step parents are most likely to rush, but it’s arguably one of the most important. Trapping even a tiny bit of moisture under a fresh diaper creates the exact warm, damp environment that rashes love.
After cleaning, you have to make sure the skin is completely dry before putting on any cream or a new diaper. A little patience here goes a very long way.
Here are a few easy ways to get the area perfectly dry:
- Pat Gently: Grab a clean, soft, dry cloth (a different one from your cleaning cloth!) and gently pat the entire area. Again, no rubbing.
- Give It Air Time: This is a fantastic—and free—tool for rash prevention. Let your baby lie on an open diaper or a towel for a few minutes. This little bit of "air time" lets their skin breathe and dry out naturally.
- Fan the Area: You can gently fan their bottom with your hand or a folded diaper to speed things up a bit.
Taking the time to dry properly ensures that when you apply a barrier cream, you’re sealing out moisture, not sealing it in. It’s also a sweet moment for a little extra bonding with your baby.
Once they’re all clean and dry, slipping them into something soft and breathable can make a huge difference in their comfort. Our collection of cozy baby zipper sleepers is perfect for keeping sensitive skin happy and comfortable after a change.
Choosing Your Diapers, Wipes, and Creams
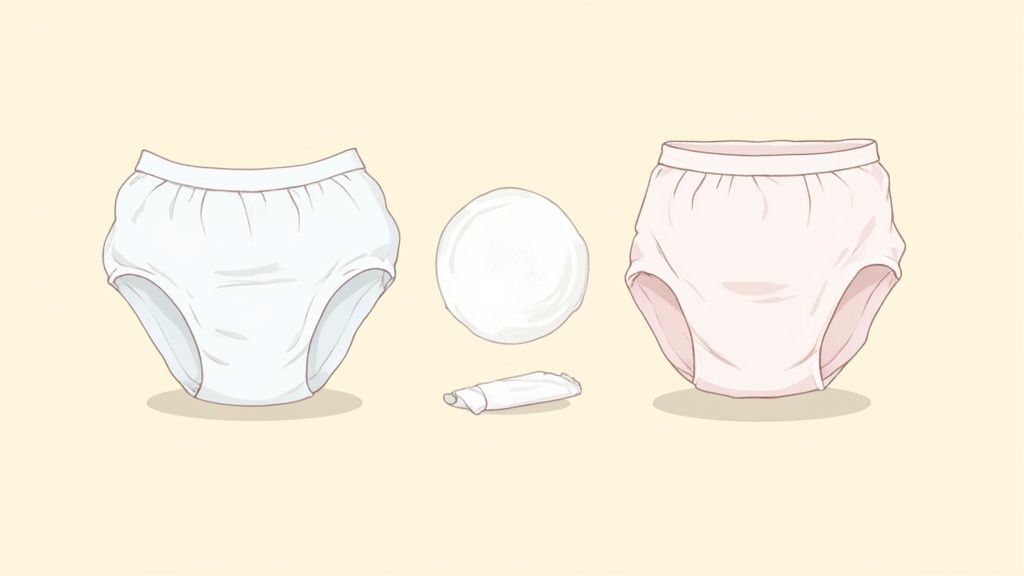
Walking down the baby aisle can feel like a pop quiz you didn't study for. With a dizzying array of diapers, wipes, and creams all screaming for your attention, it's easy to get overwhelmed. But honestly, your toolkit for preventing diaper rash doesn't need to be complicated.
Let's cut through the noise. We'll break down the products you'll be using every single day and focus on what really matters for keeping that delicate skin healthy. Making smart choices here is one of the biggest moves you can make to build a solid defense against diaper rash.
The Great Diaper Debate: Cloth Vs. Disposable
This decision often comes down to cost or environmental concerns, but it's a huge piece of the skin health puzzle, too. Both cloth and disposable diapers have their strengths and weaknesses when it comes to preventing rash, and the "best" one is simply the one that works for your baby.
Modern disposable diapers are pretty amazing. They're engineered with super-absorbent cores that wick moisture away from the skin, keeping it surprisingly dry. That moisture-wicking power is their biggest advantage. The catch? Some contain fragrances or lotions that can irritate sensitive skin, and a poor fit can lead to nasty chafing.
Cloth diapers, on the other hand, are all about breathability. Made from natural fibers like cotton or bamboo, they allow for much better airflow, which helps keep things cooler and drier. The trade-off is that they just aren't as absorbent as disposables. This means you have to be on top of your game, changing them more frequently so your baby's skin isn't sitting in wetness.
No matter which type you choose, a diaper that's too tight is a recipe for trouble. It traps moisture and causes friction. Always make sure you can comfortably fit two fingers under the waistband—that little bit of breathing room is crucial for air circulation.
Decoding Baby Wipe Ingredients
Baby wipes are a lifesaver, but they are not all created equal. Since you're using them constantly, checking the ingredient list is just as important as reading a food label. The wrong wipe can undo all your other hard work in an instant.
Your mission is to find the gentlest option you can.
- Ditch the Alcohol: Many wipes use alcohol (look for ethanol or isopropyl alcohol) as a preservative. It's incredibly drying and can strip the skin of its natural protective barrier.
- Say No to Fragrance: That "fresh scent" can be a problem. "Fragrance" or "parfum" on a label can hide a cocktail of chemicals that are common allergens. Always go for fragrance-free.
- Keep It Simple: The best wipes usually have the shortest ingredient lists. You're looking for ones that are mostly water with a few gentle, plant-derived cleansers.
If your baby has really sensitive skin, the old-school method is foolproof: a soft cloth and some warm water. It's the ultimate gentle clean, with zero chance of introducing irritants.
For parents looking to reduce chemical exposure across the board, exploring a guide to chemical-free baby products can be a great way to create a safer nursery environment.
Understanding and Applying Diaper Creams
Think of diaper cream as your secret weapon—not a treatment, but a shield. Its main job is to create a physical barrier between your baby's skin and the moisture from pee and poop.
You'll generally find two types on the shelf:
- Barrier Creams (For Prevention): This is your daily go-to. These creams usually contain zinc oxide or petroleum jelly. Zinc oxide is a superstar because it forms an impermeable layer and even has mild anti-inflammatory properties to calm any early signs of redness.
- Treatment Creams (Medicated): Save these for when a rash has already appeared. They might contain antifungal or antibacterial ingredients and should really only be used when a simple barrier cream isn't cutting it, preferably after a chat with your pediatrician.
For prevention, how you apply the cream is just as important as what you apply. After cleaning and patting the skin completely dry, spread a thin, even layer of a zinc oxide cream over the entire diaper area. You don't need to slather it on like cake frosting; a translucent sheen is all it takes to create an effective shield. This simple step, especially before bedtime, can make all the difference in the world.
Lifestyle Tweaks That Make a Big Difference

Sometimes, the best defense against diaper rash happens far away from the changing table. A few simple adjustments to your baby's daily routine can have a surprisingly big impact on their skin. Think of these as your secret weapons for keeping that little bottom happy and healthy.
It's not always about buying another cream or a different brand of diapers. The most effective strategies are often the simplest ones that create a gentler, more skin-friendly world for your little one.
The Magic of Diaper-Free Time
Honestly, one of the best things you can do for your baby’s skin is to just let it breathe. Giving them a little "air time" lets their skin dry out completely, offering a much-needed break from the damp, enclosed environment of a diaper.
You don't need much. Even just 10-15 minutes a couple of times a day can work wonders.
Of course, messes are part of the deal. The trick is to be prepared. Just lay down a waterproof mat or a stack of old towels on the floor and let your baby kick their legs freely. It's a great chance for some tummy time or just to let them wiggle without restriction. This simple habit disrupts the warm, moist conditions where diaper rash loves to start.
Your Baby's Diet and Its Impact
Starting solid foods is a huge milestone! It's also when you might notice some changes in the diaper department. What your baby eats can directly affect their poop, and certain foods can change its pH, making it more irritating to their delicate skin.
Acidic foods are the usual suspects here. Think citrus fruits (like oranges), tomatoes, and even some berries. This doesn't mean you have to ban these from their diet forever.
It's all about introducing new things slowly and paying attention.
- Go one at a time: When you introduce a new, potentially acidic food, wait a few days before trying another one. This makes it so much easier to figure out what might be causing a reaction.
- Watch their skin: Did you notice a little redness after they tried strawberries for the first time? Just take a break from them for a week or two and see if things clear up.
- Pair it with a buffer: Try serving acidic foods with something milder, like avocado or banana, to help balance things out.
Tuning into these connections helps you learn your baby's unique triggers, giving you one more tool to keep their skin comfortable.
The Unseen Irritants in Your Laundry
Have you ever thought about what's touching your baby's skin all day long? Their onesies, their crib sheets, and especially their cloth diapers can hold onto residues that irritate sensitive skin. Your laundry routine is a bigger piece of the puzzle than you might think.
Making simple swaps in your laundry room can significantly reduce everyday skin stress. Choosing gentle, fragrance-free detergents and soft, breathable fabrics creates a comforting environment for delicate skin, minimizing the risk of irritation.
Look for detergents that are "free and clear" of any dyes or perfumes, as these are common culprits behind skin reactions. I also recommend running an extra rinse cycle—it's a small step that ensures every last bit of detergent is washed away.
The fabric itself matters, too. Choosing soft, breathable materials can make a world of difference. For instance, there’s a reason so many parents are turning to bamboo. Learning about the bamboo fabric benefits shows you why it’s a go-to for baby clothes and sleepwear; it's incredibly soft, wicks away moisture, and is naturally gentle on sensitive skin. By being mindful of diet and laundry, you're building a powerful, well-rounded defense against diaper rash.
Troubleshooting Common Diaper Rash Problems
https://www.youtube.com/embed/K4Pw6qVsMVU
Even when you're doing everything right, diaper rash can crash the party. It happens to the best of us, so don't feel discouraged! Sometimes, a baby's sensitive skin just needs a little extra help. This is your game plan for when that simple red bottom starts to look more complicated.
Most rashes are just that—a bit of irritation from moisture and friction. But every now and then, it's a sign of something else. Knowing what to look for means you can switch up your strategy and get your little one comfortable again, fast.
Identifying More Than Just Irritation
A typical diaper rash looks like flat, pink, or red patches on the skin that touches the diaper. Easy enough. But if the rash starts to look different, it might be time to play detective. The two most common culprits are yeast and bacteria.
A yeast infection, usually from Candida, absolutely loves the warm, damp environment inside a diaper. Unlike a simple irritant rash, a yeast rash has some tell-tale signs:
- Its look: It's often a very bright, almost "beefy" red, and can sometimes appear shiny.
- Its location: You'll see it deep in the skin folds of the thighs and groin—places a regular rash might not even reach.
- Its calling card: The biggest giveaway is the presence of little red bumps or pimples, called "satellite lesions," that pop up around the main red patch.
If you're pretty sure it's yeast, your go-to barrier cream won't cut it. You'll probably need an over-the-counter antifungal cream. Still, it's always smart to check with your pediatrician first to get a definite diagnosis.
A bacterial infection is another possibility, especially if the skin is already broken or cracked. Keep an eye out for yellowish crusts, any oozing, or sores that look like pimples. This is a clear sign to call your doctor, as it will likely need a prescription antibiotic ointment.
Special Care for Sensitive Skin and Eczema
For babies with naturally sensitive skin or conditions like eczema, the diaper area is a real hotspot for trouble. The constant moisture can easily trigger flare-ups and leave them more vulnerable to irritation. If this is your little one, your prevention game needs to be extra strong.
Get serious about the products you use. Stick to the simplest, most gentle wipes (or even better, just water and a soft cloth) and choose diapers that are completely free of fragrances or lotions. You might also find that a thick layer of a petroleum jelly-based ointment creates a better shield for eczema-prone skin than a standard zinc oxide cream. It works by locking in the skin's own moisture while protecting it from outside irritants.
Managing Diaper Rash During Tough Times
Some situations are just brutal on a baby's bottom. A bout of diarrhea is probably public enemy number one. The stool is more frequent, more acidic, and more watery—a perfect storm for a nasty rash that appears out of nowhere.
When you're in the thick of it, your best defense is a relentless offense:
- Change Instantly: Check that diaper constantly. The second it’s soiled, it needs to be changed. No exceptions.
- Clean Gently: Wiping can be agonizing on raw skin. If you can, avoid it. A gentle rinse with a peri bottle filled with warm water or a quick dip in a shallow tub is so much kinder.
- Protect Powerfully: Apply a ridiculously thick layer of barrier cream. I mean, think about frosting a cake. This creates a heavy-duty shield that the next round of diarrhea has to get through before it ever touches your baby's skin.
Knowing When to Call the Doctor
Most diaper rashes will start to look better within two to three days with consistent, careful at-home treatment. But if you're not seeing any improvement—or if things are getting worse—it’s time to call for backup.
Reach out to your pediatrician if you see any of these red flags:
- The rash has open sores, blisters, or is bleeding.
- Your baby has a fever along with the rash.
- The rash is starting to spread outside the diaper area.
- Your baby seems to be in a lot of pain, crying uncontrollably during diaper changes.
Always trust your gut. You know your baby better than anyone. A quick call to the doctor can give you peace of mind and get your little one on the fastest path to healing.
Your Top Diaper Rash Questions, Answered
Even with the best game plan, you're going to have questions. When it comes to something as persistent as diaper rash, it feels like everyone has a different opinion. Let's clear the air and tackle some of the most common questions I hear from parents.
How Often Should I Really Change My Newborn's Diaper?
For newborns, the magic number is every 2 to 3 hours, around the clock. Yes, really. And this part is non-negotiable: change them immediately after they poop, even if you just put a fresh diaper on them five minutes ago.
I know, it feels like you're going through diapers at a dizzying pace, but there's a good reason for it. A newborn’s skin is incredibly thin and delicate, which makes it extra sensitive to moisture. Even the most high-tech, super-absorbent diaper can't wick away every last drop of wetness. It's that lingering moisture that starts to break down the skin's natural barrier.
So, try not to wait for the diaper to feel heavy or for that little wetness indicator line to turn blue. Being proactive is your best strategy here. Think of each change not just as a cleanup job, but as a preventative step that keeps their little bottom happy, dry, and irritation-free.
Is Baby Powder a Good Idea for Prevention?
This is a classic question, and the advice has definitely changed over the years. These days, most pediatricians strongly advise against using baby powder, particularly any products with talc. The main worry is the risk of your baby inhaling those fine particles, which can be really harmful to their little lungs.
But what about cornstarch-based powders? While they don't carry the same inhalation risk as talc, they can sometimes cause a whole new problem. If the rash is caused by yeast (which is surprisingly common), the cornstarch can actually act as a food source for it, making everything a whole lot worse.
A much safer—and more effective—approach is to focus on two things: getting the skin totally dry and then creating a protective barrier. After cleaning, gently pat the area completely dry with a soft cloth. Then, give it a minute or two of air time before applying a thin, even layer of a zinc oxide barrier cream. This creates a reliable shield without any of the risks that come with powders.
Could Switching Diaper Brands Be Causing a Rash?
Yes, absolutely. If you’ve recently switched diaper brands and a red rash suddenly appears out of nowhere, the new diaper is a very likely culprit. This is a classic case of irritant dermatitis, where something in the product itself is just not agreeing with your baby's skin.
Different brands use different materials, different absorbent gels, and sometimes add fragrances or lotions. Any one of those things could be the trigger for a baby with sensitive skin.
If you suspect the new diaper is the problem, the fix is simple: switch back to the old brand you know works. You should see the rash start to clear up within a few days. Here’s a little pro tip for the future: whenever you want to try a new brand, always buy the smallest pack available first. Give it a few days as a trial run before you commit to buying a giant box. This little test can save you a lot of discomfort and money down the road.
Should I Use Barrier Cream with Every Single Diaper Change?
Using a barrier cream at every single change is a fantastic prevention strategy, especially in certain situations. It’s like putting on a raincoat before you step outside—it's all about creating that shield before trouble starts. I highly recommend it for:
- Babies who are naturally prone to rashes
- Babies with very sensitive skin
- Every overnight diaper change (since they'll be in it for a longer stretch)
The cream, whether it's zinc oxide or petroleum-based, forms a physical barrier that keeps moisture from ever making direct contact with the skin.
That being said, if your baby's skin is pretty resilient and you've never had an issue with redness, you might not need it every time. In that case, you could save it for bedtime and for whenever you see the very first hint of pinkness. A thin, even layer is all it takes to do the job.
At Little Venture Co., we believe in wrapping your little ones in comfort and care. Our ultra-soft bamboo sleepwear is designed to be gentle on the most sensitive skin, providing a breathable and soothing layer that complements your rash prevention routine. Explore our collection of cozy, faith-inspired essentials at https://littleventureco.com.